How To Schedule Windows Defender/Microsoft Security Essentials Virus Definition Updates
Sorry for my month long hiatus on posting, I have been a bit busy as of late. However, today we are going to look into how to automatically schedule Virus Definition Updates on Windows Defender on Windows 8/8.1 and Microsoft Security Essentials on Windows Vista/7
By default, Windows Defender/Microsoft Security Essentials only checks for updates once per day, and these updates are tied into Windows Update. The definitions for Windows Defender/Security Essentials that are available on Windows Update are always older then the latest definitions available on the Microsoft Malware Protection Center. For this reason, its always better to have the latest virus definitions for Windows Defender to ensure your as protected as you can be from the newest viruses and other malware out there.
So without further ado, lets walk through the steps needed to schedule your computer to check with the Microsoft Malware Protection Center every hour and download and install newer definition files automatically!
Step 1: Hold down the Windows Key and press the letter R
Step 2: Type taskschd.msc into the run box and press enter. (Click Continue through UAC)
Step 3: Click "Create a Basic Task" in the top right corner of the Task Scheduler Screen.
Step 4: Name it Windows Defender Update and Click Next.
Step 5: Click the Radio button"When I Log On" and Click Next.
Step 6: Click the Browse button and find MpCmdrun.exe
(located in the C:\Program Files\Windows Defender Folder )
(Or the same location but Microsoft Security Essentials Folder on Windows 7 and Vista)
(See Screenshot Above)
Step 7: in the Add Arguments field type the following: -SignatureUpdate -MMPC
Step 8: Click Next.
Step 9: Check the Box "Open Properties Dialog for this Task When I Click Finish"
as seen in the screenshot below and click Finish.
Step 10: As seen in the box below, Click the Change User or Group and type SYSTEM in
the box and click OK.
Check the Box "Run with Highest Privileges"
Step 11: Click the Triggers Tab and make sure your settings match the Screenshot Below
Step 12: Click the Conditions Tab and make sure your settings match the Screenshot below.
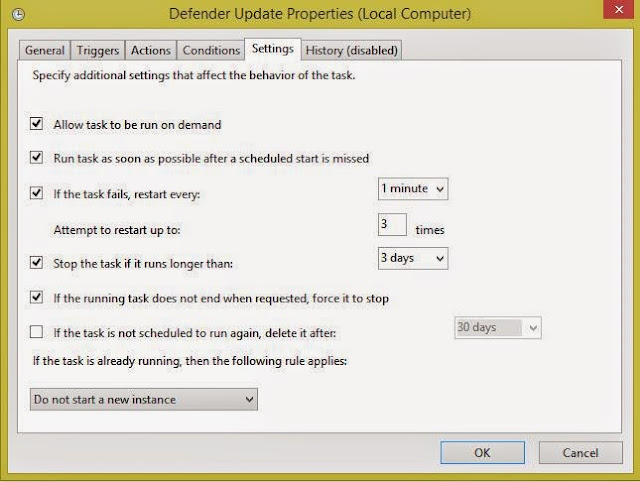
Step 13: Click the Settings Tab and make sure your settings match the Screenshot below.
Step 14: Click OK and Restart your computer.
Your finished! If you followed this guide correctly, your Windows Defender/Microsoft Security Essentials will now automatically check with the Microsoft Malware Protection Center every hour for newer virus definitions, and will install them in the background when new ones are released.
This will make windows Defender/Microsoft Security Essentials a little more effective then just the definitions from Windows Update alone.
I hope this post helps anyone out there wondering how to make Windows Defender work a little bit better. As i always say, computers are mean to work for you and make your life easier, and this post helps in that regard.
Until next time, thank you for your continued support! Have a great day!
Image Courtesy of:
M najafvand [CC BY-SA 4.0 (https://creativecommons.org/licenses/by-sa/4.0)], from Wikimedia Commons
Disclaimer: I am not responsible for anything that may happen to your PC when changing settings or changing registry values. If you choose to make changes, you do so at your own risk.. You are solely responsible for any damage to your computer , data, or other hardware due to user error, inadequate cooling, too high of voltages, incorrect software settings, and any other factors. Please remember to back up your computer before attempting this. If overclocking, Do not Overclock on the stock AMD or Intel CPU Heatsink and fans. Use Aftermarket cooling heat sinks of sufficient TDP or water cooling to ensure best chance of not having premature hardware failure. As always, remember to backup your data before attempting any change. I am not responsible for data loss or damage of any kind.


