How To Monitor PC Temperatures In Real-Time While Gaming
As a PC gamer, its often important to be able to monitor the temps of your CPU, GPU, motherboard, etc. Its also useful to be able to monitor fans speeds and CPU/GPU core clocks. However, most of the temperature monitoring programs you find online don't interface directly into the game. This means your constantly forced to Alt+Tab in and out of the game to check your temperatures.
Today, were going to solve this problem with two key pieces of software. After following this guide, you will have "Real-Time" temperature readings in-game, with the ability to show and hide them with a single key press. Lets get started!
Step 1- Download and install MSI Afterburner
NOTE:-DO NOT use any of the overclocking abilities of MSI Afterburner or move any of the sliders from their default positions. The overclocking abilities only work with AMD Radeon graphics cards. However, all the other features will work with any card. Overclocking your graphics cards can cause them to fail or damage your hardware. If you use the overclocking features, you do so at your own risk.
Step 2: Download and install HWInfo
HWInfo comes in two flavors, 32-bit and 64-bit. If you have 32-bit Windows, download the 32-bit version. If you have 64-bit Windows, download the 64-bit version.
Step 3 - Open MSI Afterburner and click the "Settings Button"
Step 4 - Click the Monitoring Tab and highlight Framerate, GPU Core Clock, and GPU Temp, GPU Usage and check the box "Show in OSD" for each one.
Step 5: - Click the "On-Screen Display" Tab and Set "Toggle On-Screen Display to the Home key, "Show On-Screen Display to PageUp key, and "Hide On-Screen Display to Pagedown key.(See Screen Shot Below) and then click OK. Now Minimize Afterburner. (It will run in background by the clock)
Keys are bound by clicking on the field and then pressing the button on your keyboard.
Step 6: Open HwInfo and click the check box "Sensor's Only" and click run.
Note:Depending on your hardware, it can take a few minutes for HWInfo to detect all your hardware. be patient.
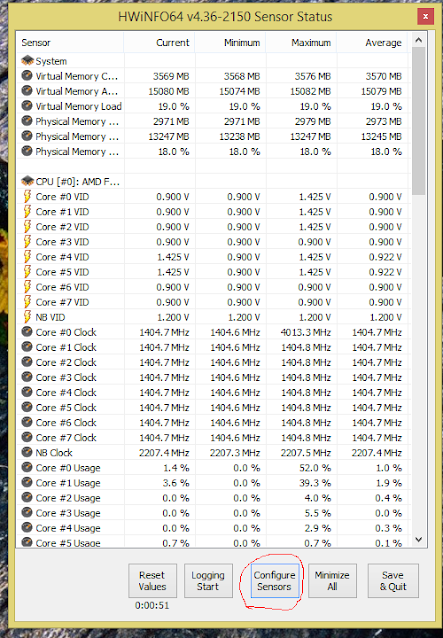
Step 7: Once its open, you should see a screen listing your temperatures, voltages, fans speeds, etc. Click the "Configure Sensors" Button.
Step 8: Once the window opens, click the "OSD/RTTS Tab at the top of the screen.
Step 9: Highlight the fields you wish to monitor in game and check the box "Show Value in OSD" and "Show Label in OSD"
Note: For each field you highlight and select, each one should have a different line and column position. For example, CPU package can be Line 1, Column 1, CPU usage can be Line 2, column 1, etc.
Step 10: Once you have the fields you wish to monitor in game set and checked off, click OK.
Step 11: You MUST run both MSI Afterburner, and HWInfo "Sensors Only" option in the background while you play a game in order for the temps to be displayed on-screen.
Now fire up your favorite game with both MSI Afterburner and HWInfo "Sensors Only" running, and you should see all your temps in the top right-hand corner of your screen. You can hide or show these temps by pressing the "Home key" on your keyboard, or the PageUp/Pagedown keys.
Optional for games your using ENB/Modified DirectX runtime libraries
If your using any sort of ENB, Shader libraries, or modified DirectX libraries, you may find the game crashes while Afteburner is running, or it just don't display your temps. To fix this simply:
1. Launch MSI Afterburner.
2. Click the OSD Icon in the taskbar (See Screenshot Below)
3. Highlight the Game Executable in the "Applications Profile Properties" (If its not listed, use the + button to manually browse to the game executable) Once its highlighted, Click the "Wrench Icon" in Riva Tuner Window.
4. After clicking the wrench, the settings window will appear. Check the Box "Enable Compatibility with modified Direct3d Run time Libraries" and Click OK.
5. Now launch your game, and everything should be fine and your temperatures you choose should now show.
Thats it! now you can monitor your temperatures in-game, in "Real-Time" without having to Alt-Tab or do anything more then press a single key.
Remember you MUST have BOTH MSI Afterburner, and HWInfo "Sensors Only" running in the background before launching your game for this to work.
These two programs are very light on resources, so they should not cause any issues for you.
I hope this article helps those out there wanting to monitor temps in game. Happy gaming folks, comments as always are welcome!
Attribution: Post image courtesy of [Public domain], via Wikimedia Commons
Disclaimer: I am not responsible for anything that may happen to your PC when changing settings or changing registry values. If you choose to make changes, you do so at your own risk.. You are solely responsible for any damage to your computer , data, or other hardware due to user error, inadequate cooling, too high of voltages, incorrect software settings, and any other factors. Please remember to back up your computer before attempting this. If overclocking, Do not Overclock on the stock AMD or Intel CPU Heatsink and fans. Use Aftermarket cooling heat sinks of sufficient TDP or water cooling to ensure best chance of not having premature hardware failure. As always, remember to backup your data before attempting any change. I am not responsible for data loss or damage of any kind.
1.jpg)


Good Information, thanks for the article
ReplyDeleteYour Welcome!
ReplyDelete